1.简介
Util.open()我们使用的最多、最频繁的组件-弹窗组件;
我们弹窗组件是基于vue-layer组件来封装的(细一点说是用vue-layer里面的iframe方法)。
你可以查看这个js里面的open方法看源码(jpaas_sources/jpaas-web/jpaas-commons/src/assets/util.js)
也可以看我的示例页面(这里面是vue-layer的用法):jpaas_sources/jpaas-web/jpaas-commons/src/my-layer.vue
也可以查看vue-layer文档:https://www.npmjs.com/package/vue-layer
虽然是用的vue-layer封装的,但有些东西可能会有些差异,所以建议看Util.js里面的open方法;
vue-layer有些小bug,我自己修改了一下vue-layer的一些源码:
通过rx-vue-layer的源码来发布版本;
感兴趣的,想自己扩展方法的,可以自己试试;比如我扩展了onResize方法以及cancel点击遮罩也可以触发,class,hideButton 等属性。
最新版本:rx-vue-layer:1.2.34
2.函数说明
2.1 打开窗口
//引入
import { Util } from 'jpaas-common-lib';
//使用
Util.open(config,destroy);
//config 参数 ;
{
    component:'',//弹窗打开的页面(组件);
    curVm:'',//当前页面的this(注意是调用这个方法页面的this,不是弹窗页面的this)
    widthHeight:['600px','400px'],//弹窗页面的宽,高属性。支持百分比写法
    title:'',//弹窗头部标题
    data:{},//传入的数据;
    max:true,//最大化弹窗,此时widthHeight的设置就是你最大化缩小后的尺寸
    resize:true,//是否允许拉伸,默认true
    shadeClose:true,//点击遮罩是否关闭弹窗,默认为true
    shade:false,//是否显示遮罩,默认为false
    zIndex:1,//弹窗层级,数据类型为Number,数值越大层级越高越优先,用于被其它弹出层遮住的情况;
    cancel:function(id){},//点击遮罩,或者关闭按钮,触发的回调函数(返回弹窗的id)
    onResize:function(id,data){},//监听弹窗 拉伸变化的回调函数,返回弹窗id 以及 数据(data);
    class:'',//给当前组件新增类名,默认rxLayerWindow
    maxmin:false,//是否隐藏 “折叠”与“放大缩小”按钮
}
2.1 关闭弹窗
Util.closeWindow(this,action,data)
这个方法在被打开的页面调用,用来关闭当前窗口并返回数据到被调用的页面。
参数说明:
| 参数 | 说明 |
|---|---|
| this | 为弹窗页面的this |
| action | 一般确定传ok,一般用来在回调函数中判断点击的动作 |
| data | 为需要返回的数据 |
Util.close(vm, action, data)
这个和上面的方法不同的是先关闭窗口,在执行回调。
2.3 注意事项
弹窗页面的props中默认需要传:layerid,lydata,destroy三个参数;
props:{
    layerid:{
        type:String
    },
    lydata:{
        type:Object
    },
    destroy:Function
}
config中的data数据 传入到弹窗打开页面的props中;
2.4 示例
2.4.1 打开页面
var baseConf = {
                curVm: this,
                widthHeight: ['800px', '600px'],
                //可以调整zIndex
                zIndex: self.zIndex,
                component: UserSelectDialog,
                title: '请选择人员',
                //传入到弹出组件的数据
                data: {
                    name:"ray",
                    age:19
                },
                shade: true
            };

            Util.open(baseConf, function (action, data) {
                if (action != 'ok') return;
                    //注:这里面的this指向 打开的弹窗;
                    //所以有时候有些人不传data过来直接this.xxx是取的弹窗里面的数据,不是当前页面的数据;
                })
            })
2.4.2 被打开组件的写法
<template>
    <div>
        <a-form-model   :label-col="labelCol" :wrapper-col="wrapperCol">
            <a-form-model-item label="name">
                <a-input v-model="name" />
            </a-form-model-item>
            <a-form-model-item label="age">
                <a-input v-model="age" />
            </a-form-model-item>
            <a-form-model-item :wrapper-col="{ span: 14, offset: 4 }">
                <a-button type="primary" @click="onSubmit">
                    确定
                </a-button>

            </a-form-model-item>
        </a-form-model>
    </div>
</template>

<script>
import {Util} from "jpaas-common-lib";

export default {
    name: "DemoOpen",
    props:{
        //必须
        layerid:{
            type:String
        },
        //必须写
        destroy:{
            type:Function
        },
        name:{
            type:String
        },
        age:{
            type:Number
        }
    },
    data(){
        return {
            labelCol: { span: 4 },
            wrapperCol: { span: 14 },
        }
    },
    methods:{
        onSubmit(){
            let o={name:this.name,age:this.age};
            //返回数据
            Util.closeWindow(this,"ok",o)
        }
    }
}
</script>
新版本 rx-vue-layer 1.2.36+
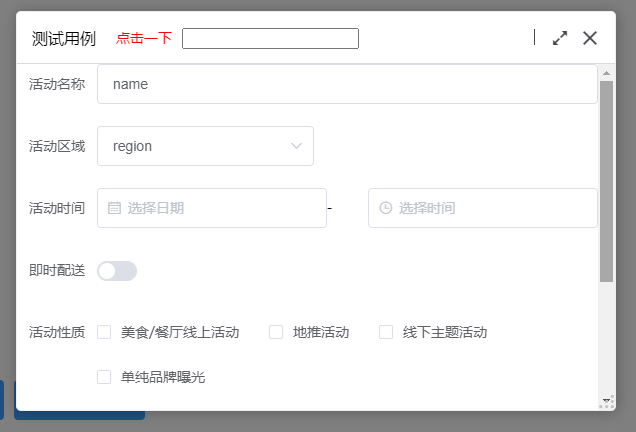
1.新增自定义头部按钮 ;
方法一:(方法定义在父页面中,通过btnFun传入);
config 新增参数
{
        toolbar:{//自定义头部按钮
            content:btnToolbar,//自定义按钮的vue文件(btnToolbar.vue)
            btnFun:{//按钮的方法(定义在父页面中的),对应btnToolbar.vue中的data中的属性;
                  add:()=>{},
                  inpu:()=>{}
              }
        },
}
//btnToolbar.vue
<template>
<div>
<div @click="add">点击一下</div>
<input type="text" @input="inpu" />
</div>
</template>
<script>
export default{
name:'btnToolbar',
data(){
return {
add:Function,
inpu:Function
}
}
}
</script>
方法二(推荐):(按钮直接写在按钮的vue文件中) rx-vue-layer 1.2.38+
通过props接收一个windowThis(打开弹窗的this)来修改弹窗的数据;
//btnToolbar.vue
<template>
    <div>
        <div @click="add">点击一下</div>
        <input type="text" @input="input" />
    </div>
</template>

<script>
    export default{
        name:'btnToolbar',
        props:{
            windowThis:{} //当前打开弹窗的this ;
        },
        data(){

        },
        methods:{
            add(){
                //点击事件
            },
            input(){
                //change事件
            }
        }
    }
</script>
效果图 rx-vue-layer 1.2.36+

